Lag
Lag Basics
If you're not exactly sure what "lag" is or why
your multiplayer internet game feels different from single player or lan play, then read
on to learn more about it.
Lag
The definition of lag is pretty simple. It's
anything that slows down your multiplayer game. This happens to everyone who plays on the
internet, including even those with high speed digital connections. The terms defined
below, bandwidth and latency, are the primary factors. You may experience lag from other
sources too, like video refresh lag when you select a resolution that's too much for your
system to handle. Of course lag isn't limited to Red Baron II. You'll find it on irc
servers, busy web sites, just about anywhere on any network.
Latency and Ping
Latency is nothing more than a delay that is measured in
milliseconds. (ms) There are 1000 milliseconds in on second. A ping is the internet
process that measures this delay from your computer to any other computer on the internet
and back. DOS under Windows 95 has a ping command that you can use by typing ping ( ip
address ) while some internet programs like ping finder access a ping directly through
your internet software ( winsock) running under Windows 95 or NT. For a normal 28.8k or
33.6k modem, a ping of around 300ms is normal. A ping of 150ms is excellent while some
would consider pings of over 500 to be unplayable. Part of the key to good Red Baron II
games is to find RBII servers that give you decent ping times. Pings for digital internet
connections are much faster depending on the type of connection it is, like isdn, cable
modems, or a T1 or T3 for example.
Bandwidth (or more accurately data
rate)
Bandwidth refers to a width of frequencies. A full
technical definition is beyond the scope of this page.*
Bandwidth is often confused with data rate which is what we will define here. Your
data rate is measured in bits per second. (bps) A 14.4k modem sends 14,400 bits per
second while a high speed digital internet connection (T1 or T3) can carry 1.54 million
bits per second or more. While playing Red Baron II, your data rate limitation comes into
play when Red Baron II tries to transfer more bits per second than your modem is capable
of. This might happen in a large room or in a game with many players. In general internet
speak however, modem players are commonly refered to as low bandwidth, while those with
high speed digital connections are refered to as high bandwidth
Packet Loss
Your data is carried in packets as it travels
accross the internet. Packet loss occurs when packets that travel from one destination to
another never make it there. Packet loss does not affect your ping time, but it does
affect the success of your pings making the round trip they were meant to. If your ping
doesn't come back, it "times out" and the program that sent it will give you a
"NET" message or something similar. While playing RBII, packet loss will cause
the "NET" icon to flash, and gameplay will be jerky. Severe packet loss in RBII
will result in you not being able to move at all.
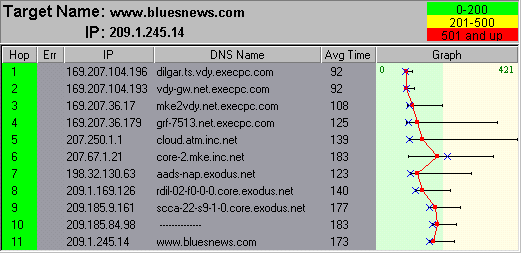
Ping Plotter is graphical a Trace Route program. Version 1.0 is freeware while 2.0 is
shareware. It to offers information you can use to send to your ISP to prove that they are
the cause of your performance problems. Overall, it's a pretty slick program. Point it at
your favorite Red Baron II server, or just check out any particular server of any game
type before you have a match on it.
Freeware/Shareware Click here to down load ping plotter |
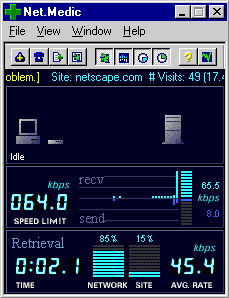 |
This program helps you to find out exactly what
is wrong with your connection. It can generate detailed service and failure reports. It
attempts to fix it if the problem if it is on your end, or informs your ISP if the problem
is on their end. In other words, it will either point it's finger at your ISP or your
setup. It even goes as far as E-mailing detailed event reports of factual data to your ISP
telling them what is wrong on their end. (see picture) Heh, probably your ISP's worst
nightmare if they know their servers are saturated. While it doesn't connect to Red Baron
II servers, you can still get some good information about your connection. This program is
not exactly cheap, but it is one of the best connection diagnostic/repair tools there is.
(Shareware) Click here to download |
Controlling Lag
Modem Control and
Setup
COM Port Setup
Lean
'Dial-Up Networking' Settings
Lean 'Network'
Settings
Updating
an Existing Dial-Up Adapter
MTU, RWIN and
TTL Values
Update the
Modem Drivers
Modem
Init String Recommendations
Updating Windows 95
Updating
Windows 95 OSR2
Updating Windows 98
Additional
Windows 95 & 98 Updates
Modem Control
and Setup
- Select the 'Modems' control panel.
- Select the 'Properties' for the modem you wish to
optimize.
- Write down your modem's COM port. (You will need this
information in the COM Port Setup section.)
- Under the 'General' tab, set the 'Maximum speed' field to
115200 for v.90 (56k) modems, 57600 for 28.8/33.6k modems.
- Unmark the 'Only connect at this speed' option.
- Under the 'Connection' tab, confirm that your Data,
Parity, and Stop bit fields are set properly (usually 8 data bits, no parity, 1 stop bit).
- Select the 'Port Settings' option, mark the 'Use FIFO
buffers' option and move the 'Receive Buffer' and 'Send Buffer' sliders to the maximum
values (14, and 16, respectively).
- Select Ok from the 'Port Settings' window to return to the
'Connection' tab window.
- Select the 'Advanced' option, mark the 'Use error control'
and 'Compress data' options. (Some people recommend disabling these options; however, they
do not affect your connection when everything else is set up properly--see the Modem
Init String Recommendations section below.)
- Mark the 'Use flow control' and 'Hardware (RTS/CTS)'
options.
- Add any 'Extra settings' you require or prefer (see the
section Modem
Init String Recommendations below).
- Select Ok from the 'Advanced Connection Settings' window.
- Select Ok from the 'Properties' window.
- Select Ok from the 'Modems' control panel.
- 'Restart the computer' from the 'Shut Down' option on the
'Start' menu.
-
COM Port Setup
This section applies to all internal and
external modems, most external ISDN adapters, some internal ISDN
adapters, and certain ASDL adapters. If you use an adapter other than a modem, replace
"modem" in the following text with your device's name. For example, replace
"modem" with "external ISDN adapter." (If you have an internal
ISDN adapter that does not incorporate a modem, this section does not apply to you. This
section only applies to devices/adapters that connect to (or emulate) a serial port.)
- Method 1
- Select the 'System' control panel.
- Select the 'Device Manager' tab.
- Select the 'Ports (COM & LPT)' option.
- Select the properties for the COM port you wrote down in
the section.
(If you have an internal modem,
its COM port may not show up in the Device Manager. Exit from the Device Manager and use
Method 2 of this section instead.)
- Select the 'Port Settings' tab.
- Change the 'Bits per second' field to match the response
given in the 'Modems' control panel (115200 for v.90 (56k) modems, 57600 for 28.8/33.6k
modems).
- Confirm that the 'Data bits', 'Parity', and 'Stop bits'
fields match those specified in the Modem Control and
Setup section (usually 8 data bits, no parity, 1 stop
bit).
- Confirm that the 'Flow control' field is set to the
"Hardware" option.
- Select Ok from the 'Communications Port Properties'
window.
- Select Ok from the 'System Properties' window.
- 'Restart the computer' from the 'Shut Down' option on the
'Start' menu.
- Skip over Method 2.
- Method 2
- Select 'Run' from the Start menu, type SYSEDIT and select
Ok.
- Select the WIN.INI window.
- Select 'Find', under the 'Search' option in the SysEdit
menu bar, type "ports" and select Next.
- Under the 'Ports' section, locate the COM port that
corresponds to your modem and change the values to the following:
COMx:=115200,n,8,1,p (For v.90 modems.)
COMx:=57600,n,8,1,p (For 28.8/33.6k modems.)
(Replace 'x' with the COM port number you wrote down in the Modem Control and
Setup section.)
- Select 'Save' from the SysEdit 'File' menu.
- Select 'Exit' from the SysEdit 'File' menu.
- 'Restart the computer' from the 'Shut Down' option on the
'Start' menu.
(The COMxFIFO and other serial port options some people
recommend adding to the [386Enh] section of SYSTEM.INI are strictly real-mode options.
They have absolutely no affect Windows 95/98 modem performance--the control panel
settings take priority at all times. Unless you use your modem in MS-DOS mode, don't waste
your time.)
Lean
'Dial-Up Networking' Settings
- Open the Dial-Up Networking folder.
- Select the properties for your ISP's connection.
- Under the 'General' tab, unmark the 'Use area code and
Dialing Properties' box.
- Under the 'Server Types' tab, confirm that the 'PPP:
Internet, Windows NT Server, Windows 95' option is selected in the 'Type of Dial-Up
Server' option box.
- Unmark the 'Log on to network', 'NetBEUI' and 'IPX/SPX
Compatible' boxes.
- If you use a modem (or any other adapter that performs
hardware-based compression), unmark the 'Enable software compression' box.
If you use an adapter that does not perform hardware-based
compression (certain ISDN and ASDL adapters), leave the 'Enable software compression' box
enabled (marked).
(If you installed DUN 1.3 or use Windows 98, two
additional options--'Require encrypted password' and 'Require data encryption'--appear
under the 'Server Types' tab of the Dial-Up Networking properties, leave them at the
default settings (unmarked). If you installed DUN 1.3 and the additional options don't
appear, see the Updating
an Existing Dial-Up Adapter section below.)
- Click on the 'TCP/IP Settings' box.
- If your ISP allows automatic IP addressing and DNS
determination, mark 'Server assigned IP address' and 'Server assigned name server
address'.
If your ISP requires a specific IP
address and/or DNS setting, mark 'Specify an IP address' and/or 'Specify name server
addresses' and complete as required by your ISP.
- Unmark the 'Use IP header compression' box.
- Confirm that the 'Use default gateway on remote network'
box is marked.
- Select 'Ok' to exit from 'TCP/IP Settings' window.
- Select 'Ok' to exit from your ISP's Dial-Up Networking
properties.
- Close the Dial-Up Networking folder.
Lean 'Network'
Settings
- Select the 'Network' control panel.
- Select the properties for the 'Dial-Up Adapter'.
- Under the 'Bindings' tab, only TCP/IP should be marked,
unmark everything else.
- Under the 'Advanced' tab, click on the Property 'Use IPX
header compression' and change its Value to 'No'.
(If
you installed DUN 1.3 or use Windows 98, two additional options appear in the Dial-Up
Adapter properties: 'IP Packet Size', and 'Enable Point To Point IP'. If you installed DUN
1.3 and the additional options don't appear, see the Updating
an Existing Dial-Up Adapter section below. If you have
not installed DUN 1.3, skip Steps 5 & 6 until you do.)
- Click on the Property 'Enable Point To Point IP' and
change its Value to 'No'.
(Please note, if you
regularly accept and authenticate dial-in calls, do not disable this option; but, be aware
that disabling this option (by setting its Value to 'No') improves connection response
(ping) time by about 3-5ms.)
- Leave the 'IP Packet Size' option at its default setting
(Automatic).
(We will manually set the packet size
in the MTU,
RWIN and TTL Values section below.)
- Click on the Property 'Record a log file' and confirm its
Value is set to 'No'.
- Select Ok to exit the 'Dial-Up Adapter' properties.
- Select the properties for 'TCP/IP'.
- Under the 'Bindings' tab, unmark everything.
- Under the 'NetBIOS' tab, unmark 'I want to enable NetBIOS
over TCP/IP'.
- Under the 'WINS Configuration' tab, select 'Disable WINS
Resolution'.
- Under the 'DNS Configuration' tab, select 'Disable DNS'.
(If your ISP does not allow automatic DNS determination,
put the DNS server address(es) under the Dial-Up Networking properties for your internet
connection (see the Lean
'Dial-Up Networking' Settings section) instead of making
a global DNS setting here.)
- Under the 'IP Address' tab, select 'Obtain an IP Address
Automatically'.
(If your ISP does not allow
automatic IP addressing, put your IP address under the Dial-Up Networking properties for
your internet connection (see the Lean
'Dial-Up Networking' Settings section) instead of making
a global IP address setting here.)
- Select Ok to exit from the 'TCP/IP' properties.
- Select Ok to exit from the 'Network' control panel.
If you do not use other network protocols/adapters,
remove everything except the components required for internet connections (and online
games): Dial-Up Adapter and TCP/IP. Keep in mind, if you install Dial-Up Networking 1.3,
you will need to remove all unused network protocols/adapters again. Also, the
instructions for DUN 1.3 state not to remove individual network components via the
'Network' control panel; however, removing them individually does not harm the system or
the newly installed DUN 1.3 online connection components as long as you select to keep
newer files when notified of any.
Finally, in Windows 98, if you delete unnecessary
Adapters and Protocols from the 'Network' control panel, subsequent visits to the
'Network' control panel will cause Windows 98 to display the error message, "Your
network is incomplete." Ignore this error message, online play/internet connection
components are complete and work flawlessly.
Updating
an Existing Dial-Up Adapter
If you install DUN 1.3 under Windows 95, the installation
program does not automatically update the existing Dial-Up Adapter. If you did not have an
existing Dial-Up Adapter when you installed DUN 1.3 or are using Windows 98, skip this
section; otherwise, use the following instructions to update your Dial-Up Adapter:
- Select the 'Network' control panel.
- Select the 'Add' option.
- Select 'Adapter' and click 'Add'.
- Select 'Microsoft' in the left hand side, then select
'Dial-Up Adapter' in the right hand side and click Ok.
- Select Ok to exit from the 'Network' control panel and
update your Dial-Up Adapter. (Remember to select to keep any newer files during the update
process.)
Please note: Windows 95 & 98 do not allow more than
two Dial-Up Adapters to be installed at any one time. If you encounter an error message
telling you this, delete one of the existing Dial-Up Adapters and proceed as normal. Also,
you must repeat the steps outlined above in the Lean
'Dial-Up Networking' Settings section because the new,
updated Dial-Up Adapter resets everything to the default values and must be reconfigured.
MTU, RWIN and
TTL Values
In order to complete the following section, you must know
your ISP's Maximum Transmission Unit (MTU). If your ISP's help desk or the connection
response in the terminal window provide your MTU value, skip Steps 1 & 2 and go
directly to Step 3.
- Open an MS DOS Prompt from the 'Programs' sub-menu of the
Start Menu.
- Type PING -F -L xxxx www.YourISP.com - Replace
"xxxx" with numerical values until you find the highest value where the PING
command no longer responds with the error: "Packet needs to be fragmented but DF
set."
- Warning:
- Do not repeat this step after your MTU has been
set or else the PING command will incorrectly report an even lower maximum packet (MTU)
size! Your MTU value will never be lower than 576; 576 is the minimum
MTU any TCP/IP router must support. If the MTU value the PING command returns is
less than 576, your MTU was previously set. Also, DUN 1.3 and Windows 98 automatically set
the MTU to 576 for connections slower than 128kbps, 1500 for connections faster than
128kbps. An MTU of 576 is not the best setting for online gaming if your ISP
supports a larger size and could cause up to 2% of packet loss you may experience.
Therefore, if you change ISPs and/or your MTU has been previously set or
install DUN 1.3 or use Windows 98 and allow either to automatically determine and set your
MTU (see the Lean 'Network'
Settings section), you will need to set the MTU (see
Step 3, below) to an extremely large value (for example 2000) and reboot in order to
receive an accurate MTU response from the PING command before you continue on to Step 3.
If the PING command continues to respond with a value lower than 576 after resetting the
MTU, your ISP only supports the minimum MTU setting of 576, set your MTU to 576 and
proceed on to Step 4.
- Set the MTU size to match your ISP's MTU using one of the
following methods--depending on your particular setup:
- Method 1 (Windows 95 without DUN
1.3)
- [HKEY_LOCAL_MACHINE\System\CurrentControlSet\Services\Class\NetTrans\000x\MaxMTU]
- Select RUN from the Start menu, type REGEDIT and select
Ok.
- In the left-hand portion of the REGEDIT window, click on
the plus sign next to 'HKEY_LOCAL_MACHINE'.
- Click on the plus sign next to 'System'.
- Click on the plus sign next to 'CurrentControlSet'.
- Click on the plus sign next to 'Services'.
- Click on the plus sign next to 'Class'.
- Click on the plus sign next to 'NetTrans'.
- Click on '000x'. There will probably be more than one
'000x' entry here, look for the '000x' entry that corresponds to your active
'Dial-Up Adapter' and replace the 'x' with your correct number.
- In the right-hand portion of the REGEDIT window, look for
a registry key named 'MaxMTU', if you find it, skip Step 10.
- From the Edit Menu, select 'New', then select 'String
value' and name it 'MaxMTU'. (Be sure to capitalize the string name exactly as
shown.)
- Double click on the MaxMTU registry key and type your
ISP's MTU value into the 'Value data' field.
- Select 'Exit' from the Registry Menu.
(If you are having trouble determining which 'Dial-Up
Adapter' entry is active, use REGEDIT to look at the '000x' entries in the
[HKEY_LOCAL_MACHINE\Enum\Root\Net\] section of the registry. The '000x' entry whose
'DeviceDesc' (device description) key reads 'Dial-Up Adapter' will have a 'Driver' key
that points to the active 'Dial-Up Adapter' entry for Step 8 in the Method 1 instructions
above.)
If your MTU is being automatically determined by DUN 1.3
or Windows 98, you will need to use Method 2 below to manually change your Dial-Up
Adapter's MTU registry entry.
- Method 2 (Windows 95 with DUN
1.3 or Windows 98)
- [HKEY_LOCAL_MACHINE\System\CurrentControlSet\Services\Class\Net\000x\IPMTU]
- Select RUN from the Start menu, type REGEDIT and select
Ok.
- In the left-hand portion of the REGEDIT window, click on
the plus sign next to 'HKEY_LOCAL_MACHINE'.
- Click on the plus sign next to 'System'.
- Click on the plus sign next to 'CurrentControlSet'.
- Click on the plus sign next to 'Services'.
- Click on the plus sign next to 'Class'.
- Click on the plus sign next to 'Net'.
- Click on the plus sign next to '000x'. There will probably
be more than one '000x' entry here, look for the '000x' entry that corresponds to your active
'Dial-Up Adapter' and replace the 'x' with your correct number.
- Click on the plus sign next to 'Ndi'.
- Click on the plus sign next to 'Params'.
- Click on the plus sign next to 'IPMTU'.
- Click on 'enum'.
- In the right-hand portion of the REGEDIT window,
right-click 'Automatic' and select 'Delete'.
- From the Edit Menu, select 'New', then select 'String
value' and name it your MTU value (for example, mine is named 1472).
- Double click on the MTU value you just added and type
"Automatic" in the 'Value data' field.
- Select 'Exit' from the Registry Menu.
(If you are having trouble determining which 'Dial-Up
Adapter' entry is active, use REGEDIT to look at the '000x' entries in the
[HKEY_LOCAL_MACHINE\Enum\Root\Net\] section of the registry. The '000x' entry whose
'DeviceDesc' (device description) key reads 'Dial-Up Adapter' will have a 'Driver' key
that points to the active 'Dial-Up Adapter' entry for Step 8 in the Method 2 instructions
above.)
- Set the RWIN size between 3000 and 5000 (average download
speed (in kbps) for modems) as a multiple of your MTU size minus 40. For example, my RWIN
size of 4296 is my MTU size of 1472 minus 40 multiplied by 3. My RWIN value falls between
3000 (28.8/33.6k) and 5000kbps (56k), if you are on a faster (or slower) connection, use
your own average download speed (in kbps) as the lower and upper range when setting your
RWIN. Algebraically, the equation for my RWIN value was x(MTU-40)=RWIN or
3(1472-40)=4296. Use the following instructions to set your RWIN.
[HKEY_LOCAL_MACHINE\System\CurrentControlSet\Services\VxD\MSTCP\DefaultRcvWindow]
- Select RUN from the Start menu, type REGEDIT and select
Ok.
- In the left-hand portion of the REGEDIT window, click on
the plus sign next to 'HKEY_LOCAL_MACHINE'.
- Click on the plus sign next to 'System'.
- Click on the plus sign next to 'CurrentControlSet'.
- Click on the plus sign next to 'Services'.
- Click on the plus sign next to 'VxD'.
- Click on 'MSTCP'.
- In the right-hand portion of the REGEDIT window, look for
a registry key name 'DefaultRcvWindow', if you find it, skip Step 9.
- From the Edit Menu, select 'New', then select 'String
value' and name it 'DefaultRcvWindow'. (Be sure to capitalize the string name exactly
as shown.)
- Double click on the RWIN registry key and type the value
you determined from the RWIN equation in the above instructions into the 'Value data'
field.
- Select 'Exit' from the Registry Menu.
(Please note, RWIN directly affects throughput, do not
set it too low (below 3000 for a modem user).)
- Set the TTL to 32.
[HKEY_LOCAL_MACHINE\System\CurrentControlSet\Services\VxD\MSTCP\DefaultTTL]
- Select RUN from the Start menu, type REGEDIT and select
Ok.
- In the left-hand portion of the REGEDIT window, click on
the plus sign next to 'HKEY_LOCAL_MACHINE'.
- Click on the plus sign next to 'System'.
- Click on the plus sign next to 'CurrentControlSet'.
- Click on the plus sign next to 'Services'.
- Click on the plus sign next to 'VxD'.
- Click on 'MSTCP'.
- In the right-hand portion of the REGEDIT window, look for
a registry key name 'DefaultTTL', if you find it, skip Step 9.
- From the Edit Menu, select 'New', then select 'String
value' and name it 'DefaultTTL'. (Be sure to capitalize the string name exactly
as shown.)
- Double click on the TTL registry key you just added and
type "32" in the 'Value data' field.
- Select 'Exit' from the Registry Menu.
- Select Ok to save the settings to the registry.
- Select Exit.
- 'Restart the computer' from the 'Shut Down' option on the
'Start' menu.
Some people recommend setting an additional value, the
Maximum Segment Size (MSS); however, Windows 95/98 does not support setting the MSS
value, so setting it is an exercise in futility. (Windows NT does support setting the MSS
value.)
Some people recommend setting the NDI Cache; however,
this is an IPX/SPX setting that applies to network devices (Ethernet cards, certain ISDN
adapters, etc.). Setting the NDI Cache does not help modem users. Modems are
communication devices, not network devices. Besides, if you uninstalled the IPX/SPX
protocol, this setting is useless to you.
Update the
Modem Drivers
(If you use Windows OSR2.x or Windows 98, skip Steps 1-3
and go directly to Step 4 instead.)
- Download the UniModem (a.k.a. voice
modem) drivers from Microsoft and extract to a temporary directory.
- Open Windows Explorer and select the directory where you
extracted the UniModem files.
- Right click the UNIMODV.INF file and select Install.
- Download the latest INF file(s) for your modem from its
manufacturer and extract to a temporary directory.
- Select the 'System' control panel.
- Select the 'Device Manager' tab.
- Select the 'Modem' option.
- Select the modem you wish to update and click on the
'Properties' option.
(Steps 9 - 12 are based on
Windows 95 OSR2, the steps vary on earlier versions.)
- Under the 'Driver' tab, select the 'Update Driver' option.
This will activate OSR2's 'Update Device Driver Wizard', let it search for an updated
driver automatically, if it finds it by itself, go to Step 12.
- Select the 'Other Locations' option.
- Select 'Browse' to locate the temporary directory where
you extracted the manufacturer's files then click 'Ok'.
- Select 'Finish' to allow the Update Device Driver Wizard
to update your modem driver with the newest version, if it isn't already installed.
- Select 'Close' to exit out of the modem properties.
- Select 'Close' to exit out of Device Manager.
(Step 15 is optional and requires access to Windows 98. If you do
not have the legal right to use Windows 98 or its components, go to Step 16. Also, Step 15
does not apply to Windows 98 itself, go to Step 16 instead.)
- If you use 16bit Windows applications under Windows
95 and have access to Windows 98, replace version 4.00.950 of the communications driver
(COMM.DRV in your C:\Windows\System directory) with the newer version (4.10.1998) included
with Windows 98. You may have to 'Restart the computer in MS-DOS mode' from the 'Shut
Down' menu in order to copy over your current version of the communications driver.
If you strictly use 32bit Windows applications,
this step will not help you; 32bit Windows applications use VCOMM.VXD (as a component of
VMM32.VXD) as their communications driver.
- 'Restart the computer' from the 'Shut Down' option on the
'Start' menu.
Modem
Init String Recommendations
I only use, own and recommend external USRobotics Courier
v.Everything modems. If you are lucky enough to own one of these fine pieces of
hardware, the Init string is below. If you don't use the same modem I do, all I can
provide is the following guidelines to use when setting your own modem Init up:
- Enable hardware handshaking (a.k.a. RTS/CTS)
- Disable retrains (Do not disable upshifts
and downshifts!)
- Disable MNP 5 (This is the source of most people's
recommendation to disable data compression and error detection. Both MNP 5 and V.42bis
compress data; however, V.42bis is 30% faster and does not add latency to the data stream,
while MNP 5--an older compression scheme--often does add latency to the data stream.)
My USRobotics Courier v.Everything (v.90) modem Init
string is: &F1&A3&K3S15=2S11=38S69=12. The items mentioned above are
specifically addressed by the &F1, S15=2 and &K3 commands, respectively. Put your
Init string in the 'Extra Settings' field as described in the Modem Control and
Setup section.
Updating Windows 95
(If you use Windows 98, do not install any of the
following updates.)
(The order listed below is the recommended installation
order.)
If use Internet Explorer 5, visit Microsoft's Windows Update page and install any
pertinent and/or critical updates as well.
Updating
Windows 95 OSR2
(If you use Windows 98, do not install any of the
following updates.)
(The order listed below is the recommended installation
order.)
- Universal Serial BUS Update - Build 1214 (No direct
connection benefit.)
- DCOM95 1.3 (No
direct connection benefit.)
- Year 2000 DIR and DATE
Command Fix (No direct connection benefit.)
- Winsock 2.2 Release
- This update significantly improves internet connections.
(Warning: You must remove
any foreign Winsock(s) you may have inherited (on a pre-installed machine) or unknowingly
installed (from AOL, CompuServe, etc.), before installing the Winsock 2 update! The
Winsock 2 installer will not overwrite non-standard Winsocks! Also, most pre-packaged
Internet software (AT&T WorldNet, PacBell Net, etc.) do not recognize newer versions
of Winsock and/or TCP/IP components and install older versions without properly
uninstalling newer components. This can seriously affect internet connections and the
recommendations on this page--create the Dial-Up Networking connection yourself (the Lean 'Dial-Up Networking' Settings
and Lean 'Network' Settings
sections accomplish this) rather than have a setup program do it for you. Finally, if you
decide not to install Winsock 2.x, consider installing Winsock 1.2;
which is the latest version in the Winsock 1.x series.)
- Virtual Network Redirector
Update - Patches some network security holes.
- Dial-Up Networking 1.3 -
This update significantly improves internet connections.
(This update incorporates the previously recommended IP and TCP
Updates for both Winsock 2 and Winsock 1.2.)
- Dial-Up Networking 1.3 128bit
Encryption Update (No direct connection benefit.)
- Windows
Library Update (No direct connection benefit.)
- AMD K6-2/350 and Above Patch
- Resolves software timing issues with high speed processors. (No direct connection
benefit.)
- Windows 98 Year 2000
Update (No direct connection benefit.)
(To
install this Windows 98 update on a Windows 95 OSR 2.x system, use WinZip or a similarly-capable utility to extract the
files to a temporary directory, right-click on the OEMY2K.INF file and select
"Install". (By the way, this installation trick allows you to manually install
other Windows 98 updates as well.) See if you notice anything different about your boot-up
screen after installing this update.)
- Windows Continuous Operation
Fix (No direct connection benefit.)
If use Internet Explorer 5, visit Microsoft's Windows Update page and install any
pertinent and/or critical updates as well.
Updating Windows 98
(The order listed below is the recommended installation
order.)
Of course, visit Microsoft's Windows Update page and install any
pertinent and/or critical updates as well.
Additional
Windows 95 & 98 Updates
All versions of Windows 95 & 98 benefit by installing
the following updates. To see the most improvement, install the following updates after
updating your version of Windows (see the Updating Windows 95, Updating Windows 95 OSR2 or Updating Windows 98 sections,
respectively).
(The order listed below is the recommended installation
order.)
Lean IE5 & OL2000 Registry Settings
(The following steps apply after Internet Explorer 4, 5
or Outlook 98/2000 have been installed--see the Additional Windows 95/98 Updates
section.)
[HKEY_LOCAL_MACHINE\SOFTWARE\Microsoft\Windows\CurrentVersion\Run\BrowserWebCheck]
- Select RUN from the Start menu, type REGEDIT and select
Ok.
- In the left-hand portion of the REGEDIT window, click on
the plus sign next to 'HKEY_LOCAL_MACHINE'.
- Click on the plus sign next to 'SOFTWARE'.
- Click on the plus sign next to 'Microsoft'.
- Click on the plus sign next to 'Windows'.
- Click on the plus sign next to 'CurrentVersion'.
- Click on 'Run'.
- In the right-hand portion of the REGEDIT window,
right-click 'BrowserWebCheck' and select 'Delete'.
- Select 'Exit' from the File Menu.
(If you are absolutely certain your computer
does not require any other programs listed at the 'Run', 'RunOnce' and 'RunServices'
Registry locations, you can delete them as well. My system contains only 'SysTray' at the
'Run' Registry entry; nothing in any of the 'RunOnce' and 'RunServices' Registry entries.)
Disclaimer: I
am not responsible for any problems you may encounter when following these
recommendations. I use all of the above recommendations with outstanding success. This
page assumes your system is completely free of existing issues and that none
of the above settings have been previously altered. Finally, packet loss is packet
loss...you can have the best ping/connection in the world and still experience packet
loss, contact your ISP.