

There are a few things one can do to get better performance out of Red
Baron II.
People with older computers should first go to their computer manufacture's or your modem
manufacture's web site and check for V.90 modem drivers. It doubled my modem speed. Run a
scandisk once a week and defrag once a month. Clear your internet cache often
Start by cleaning up your computer system
Deleting Temporary Files
Many programs keep temporary files on the hard drive. If the computer
locks up or if you do not exit Windows 95 completely, an accumulation of
temporary files can cause errors. The temporary files generally have a
*.tmp extension and often start with a ~ as the first character in the
file name. To find these files:
1. Right click on My Computer icon.
2. Click on Explore that appears on the menu.
3. Click on Tools.
4. Click on Find.
5. Click on Files or Folders.
6. In the box labeled Named; type: *.tmp
7. Click on the box labeled "Look In."
8. Highlight the information in the Look In box.
9. Type C:\WINDOWS\TEMP
10. Click on the Find Now button on the upper right hand side of the
window.
11. All temporary files appear in the box at the bottom of this window.
12. Press the CTRL key and the A key on the keyboard together and
highlight all of the files with this extension *.tmp.
13. When all of the files are highlighted, press the Delete key.
14. Click on the New Search button on the right side of your screen.
15. A window appears informing you that the boxes for the last search
will be cleared.
16. Click on the OK button.
17. In the Named box, type: ~*.*
18. Click on the Find Now button.
19. Additional temporary files appear in the box at the bottom of the
screen.
20. Press the CTRL key and A key on the keyboard together to highlight
all of the files.
21. When all files are highlighted, press the Delete key.
22. When completed, click on the X button in the upper right corner of
this window.
23. Right click the Recycle Bin on the desktop.
24. Click on the word Empty Recycle Bin.
25. Click the Yes button when asked.
26. All temporary files are now deleted.
Removing Startup programs
I have removed every program that starts up when the computer starts. When you hit
Ctrl-Alt-Del a window pops up with all the programs that are currently running on your
system. With windows 95 the only programs that should be running are Explorer and Systray.
Everything else should be removed. This is also important when you are loading a new
program. Turning everything off clears your RAM of unnecessary programs that are running.
Below are instructions on how to place all of these programs into a folder that will not
start them on startup.
Start Up Group
Programs in the StartUp Group can contribute to errors, especially if
the program is corrupted and attempts to load automatically as Windows
95 starts. To view programs in the StartUp group:
1. Rich click the Start Button in the lower left corner.
2. Click on Open.
3. The Start Menu windows appears on your screen.
4. Double click the Program icon in this window.
5. In the Programs windows that appears, double click on the StartUp
icon.
6. You will see a listing of all of the programs that StartUp
automatically.
7. Right click on an open area on the Windows 95 Desktop.
8. Click the word Paste that appears on the menu.
9. Once the selected programs are removed from the StartUp window, click
on the X in the upper right corner of this window.
10. Click on the X again in Programs.
11. Click on the X again in the Start Menu window to return to the
Windows 95 Desktop.
12. Click the Start button in the lower left corner of the screen.
13. Click the word Shut Down.
14. Click Restart the computer.
Changing your computers settings in control panel for
better performance
First click on Start---then Settings----then control panel
Double click on System

Now click on the Performance tab
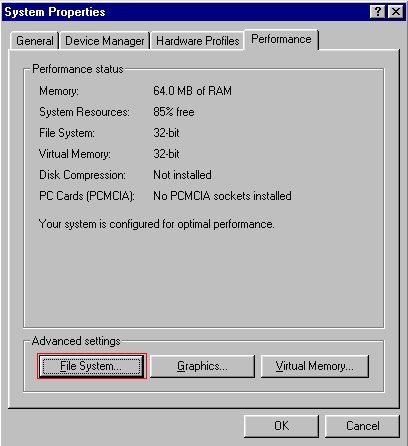
Now click on File System
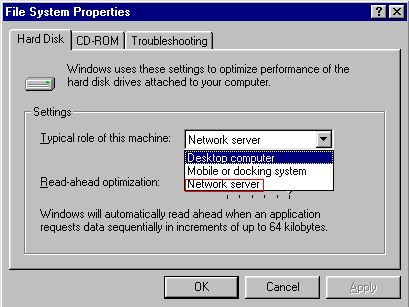
Click on arrow to get drop down box. Highlight Network server. Click apply.
You will now be prompted to restart your computer. Click yes.
Tweaking your Modem
Click on Start----then Settings----then Control panel
Double click on System

Click on Device Manager Tab
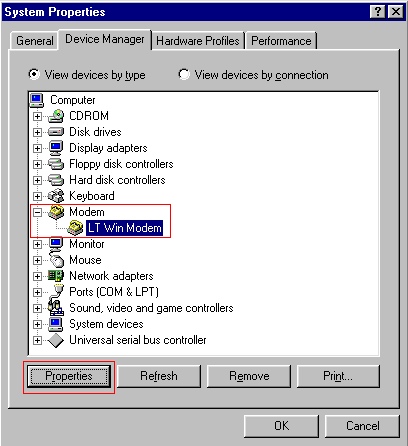
Click on the + sign so it looked like above example. Highlight LT WinModem.
Click on the properties Button.
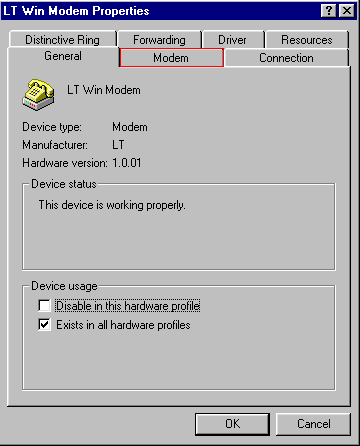
Click on the Modem Tab
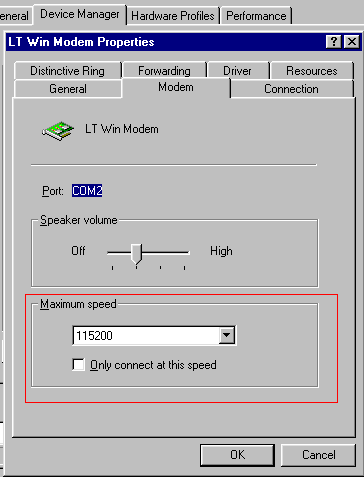
Make sure that your maximum speed settings is set like the above example
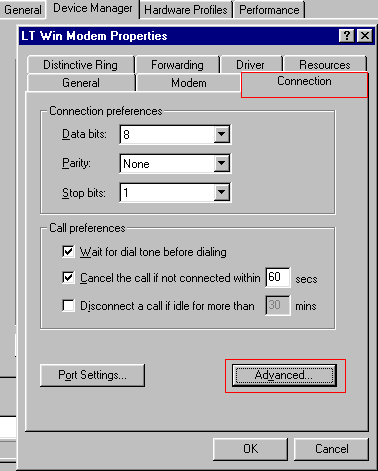
Now click on the Connection tab. Then click on advanced.
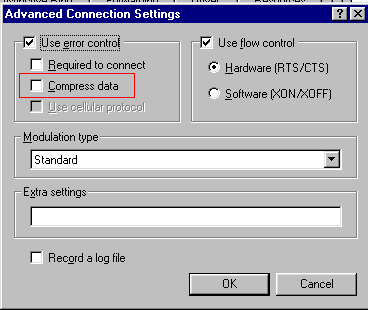
Make sure that Compress data box is not checked. Click OK.
Close or OK the rest of the pop up boxes out.
Run a tracert to see where the connection fails. You can do this by:
click Start---Programs---MSDOS---Type in TRACERT name of web site---then hit enter.
To find out about your system settings:
Click Start---Run--then type WINIPCFG
then click on more info.
![]()
| Optimizing
game performance with the Graphics Settings before flight Red Baron 3-D is
designed to run with a smooth frame-rate on both older and slower computer systems as well
as those that are on the bleeding edge of technology. By adjusting the level of graphical
detail, you can control the frame-rate of the game so that it runs smoothly on your
system.
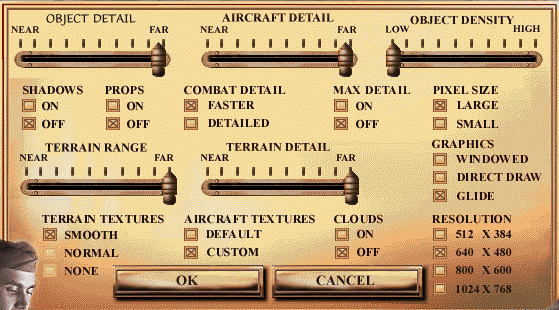
Click the Graphic Setting button and a box similar to the Realism Settings box appears in the middle of the screen. As with the Realism Settings, you can quickly adjust the level of graphical detail by moving the slider to the left or right. To get to the more detailed graphics settings, click the Graphic Options button at the bottom of the box, revealing a screen with 15 different options you can adjust or control. Starting in the upper left corner, the options are: Object Detail – determines the distance at which ground objects are drawn in detail. When set to Far, ground objects will be rendered in full detail at the edge of your visibility range, which slows down the frame-rate, whereas if set to Near, objects are not fully detailed until you are quite close to them. Aircraft Detail – determines the distance at which other aircraft are rendered in full detail. As with the Object Detail setting, the selected distance affects the game’s frame-rate. However, the distance at which other planes are drawn also affects the distance at which you can identify them and gauge their heading and intent. In general, it is much better to reduce ground detail instead of reducing aircraft detail because the ground detail rarely affects combat. Object Density – determines the number of ground objects that are drawn. A High number of ground objects looks more realistic but can severely decrease the game’s frame- rate. Changing PreferencesShadows – when turned on, all airplanes and buildings generate shadows based on the sun’s position in the sky. Although the shadow serves as a useful tool in helping gauge your altitude above the ground, it severely impacts the game’s frame-rate and should be one of the first details you turn off when trying to speed up game play. Props – when turned on, your plane’s propeller is drawn during flight, obscuring your view through the prop animation. Turning it off, increases the game’s frame-rate. Combat Detail – when set to faster, non-essential graphics, such as building textures and clouds, are removed when-ever you are in combat. This helps offset the natural reduction in the game’s frame-rate, which occurs when a large number of aircraft are being drawn. Max Detail – all objects in the game, including buildings and aircraft, are rendered at two levels of detail. When this option is turned on, the higher detail level setting is used for all objects and when set to off, the less detailed objects are used, which can increase the frame-frate. Note that when max detail is on, aircraft control surfaces will move when viewed from outside the cockpit. Pixel Size – determines which set of terrain "tiles" is used when rendering the terrain. The Large pixels option uses a fewer number of less detailed "tiles", which can give the ground a more "tiled" appearance, but improves the game’s frame-rate. The Small option uses more "tiles" or greater detail, making the changes in terrain appear more smooth, at the expense of a slower frame-rate. Terrain Range – determines the distance at which the terrain polygons are drawn, with anything beyond that distance being obscured by a "fog" effect. Terrain Detail – determines the distance at which the terrain polygons are filled with the terrain textures. If you don’t want to see polygon looking terrain, you should have this set as far or farther than you have the Terrain Range set. Graphics – Red Baron 3-D is capable of being run with software or hardware rendering. Setting the graphics to Windowed means that the game is software rendered within a window on your desktop. This is the slowest method and should only be used on the fastest computer systems. The DirectDraw™ option is still software rendered, but is a bit faster because the game occupies the full screen. The Glide option is only available if you have a 3dfx-based 3D accelerator with the
Glide 2.43 (or higher) drivers installed. This full-screen option gives the fastest
frame-rates available in the game. Note that Voodoo2™ cards require version 2.51 or
higher.
|